
Face photos are not mere snaps; they are a compelling way to communicate personality, mood and narrative. Whether for social media, work, or an individual keepsake, learning to capture an excellent face photograph will take your craft to the next level and leave a lasting impression. We’ll go over everything you need to know, though, to take a killer face photo.
The Very Importance of Lighting in a Photo of Face
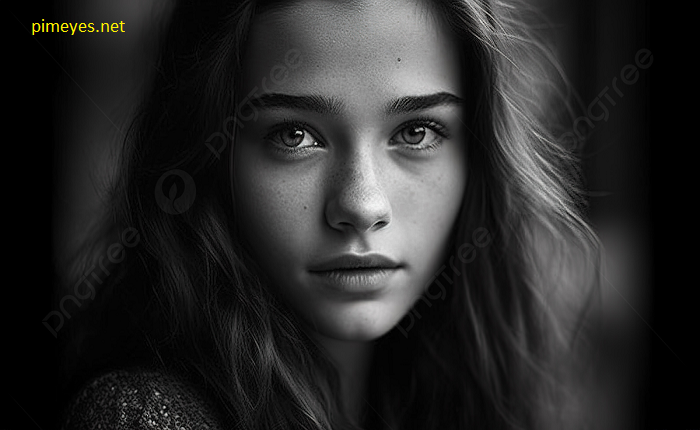
Lighting can make or break a face photo. Good lighting brings out facial features, creates a mood, and ensures the subject looks their best. In general, natural light is best for face photos. Early morning or late afternoon — the golden hours — have soft, flattering light. Avoid the sharp midday sun, which casts terrible shadows on the Face. Use a ring light or softbox to spread light evenly for indoor face shots. Enhance naturalness by placing your light source at a 45-degree angle, avoiding full-on light that can wash out facial features. Play around with different lighting setups to determine what opens up your subject’s Face and suits their skin tone.
How to Select the Best Background for a Face Photo
Minimal backgrounds direct attention to the subject’s Face. Face photo are all about simplicity.
Professional face photos work well with neutral backgrounds such as white, grey, beige, etc. For more artistic shots, you might use textured or patterned backdrops that relate to the theme of the photo but aren’t distracting. In outdoor shoots, select backdrops that work with the colours and vibe of your subject’s outfit. A blurry background from a shallow depth of field (from using a wide aperture) gives any face a professional touch.
Short Guide on How to Pose for the Face Photo
A good picture of the Face should show confidence and attraction. A good pose emphasizes the subject’s best features and creates interest in the shot. Ask your subjects to soften their jaw and tilt their chin slightly for added dimension. With a little angle to the Face rather than looking straight at the camera is usually much more flattering. Play with expressions, from natural smiles to serious looks, to capture diverse moods. You want to make the subject comfortable because a natural expression makes any face photo look good.
How Camera Settings Contribute to a Stellar Face Capture
You should know your camera settings to take quality face pictures.
Set your camera to a low ISO (100 or 200) for snappy face photos and the least amount of grain. Start with a wide aperture (f/2.8 or f/1.8) to create a shallow depth of field that blurs the background and highlights your subject’s Face. To get crisp images even when your subject is moving you should use a fast shutter speed (for example, 1/125, if not faster
Smartphone users, look at portrait mode features to make your video look more professional. To eliminate relatively overexposed or underexposed face pictures, steady the exposure on your own.
You Are Not A Face Editor
Now, post-processing can turn that amazing face photo into something extraordinary. Editing aids in polishing colours, eliminating flaws, and highlighting details. Keep in mind that you should start with minor adjustments such as brightness, contrast, and white balance for a natural appearance. Touch up skin slightly, but not too much, so it still looks real—overly retouching a face photo can make it look fake. For more detailed edits, use apps such as Adobe Lightroom or Snapseed. Focus on eyes and lips because if these two attractive points come out better, it would make the photo attractive. Always double-check the end result to make sure it looks polished but still organic.
Impactful Face Photos for Varied Contexts
The purpose of a face photo helps determine its style, composition, and tone. The approach, however, varies depending on whether it’s for a professional profile, social media, or a creative project. For professional headshots, keep neutral backgrounds and formal apparel. Make sure the lighting is gentle and even. Face for social media are more creative—use angles, props, and expressions to show your personality. Creative projects may push boundaries through dramatic lighting, bold color, or atypical poses. When preparing your photo, always keep in mind how it will be used.
Face Photos: Common Mistakes to Avoid
Even tiny errors can ruin the quality of a face picture. Knowing what mistakes are highly probable helps avoid such mistakes.
Stay away from unflattering shadows cast by harsh lighting. In particular, look out for stray hairs, reflections in glasses, and uneven makeup: these have the power to distract. Make sure the subject’s Face is in focus—blurry face are a wasted opportunity.
Another common mistake is overediting. Retouching should improve the photo while preserving the subject’s natural look. An aesthetically acceptable face photo requires a balance.
Face Photo-Making Technique with Mobile Camera
Smartphones have made face photography a mechanized, affordable technology. You can shoot beautiful face photo graphs on your phone with the best practices. Whenever possible, use natural light and avoid flash unless necessary, as it produces harsh shadows. Turn on gridlines to frame your shot according to the rule of thirds. Use portrait mode for professional shots, and clean your lens before taking a photo for clarity—further editing face through post-processing apps like VSCO or Lightroom Mobile.
The Importance of Expression and Emotion in a Face Photo
A face photo captures an emotion that tells a story that touches the viewer. Real feelings make for pictures with impact.
Talk your subject into relaxing and thinking of a happy memory to snap a natural smile. To make even more difference between the face photos, work with them to evoke specific emotions, such as determination or peace, for the photos.
It’s got to feel authentic—the more authentic the expression, the better the face . Try to use diverse expressions to give some variety to your shots.
Using Props and Accessories in a Face Photo
People also use props and accessories to present the individual in a photo. However, the accessories should support the subject rather than detract from it. Props such as hats, glasses, or scarves can make the photo more personal, while flowers or books can give it a certain vibe. Props should be simple and relevant to avoid cluttering the composition. Try holding things close to the Face or using them as background. Used creatively, props can elevate a basic photo to something you remember.
Conclusion
Learning how to build your technique and skillset to take great photos of faces takes time and investment. Everything from the light to the pose to the edit to the expression plays a key role in how successful an image is. With the tips and techniques outlined in this guide, you’ll be more than ready to take stunning face photos for whatever reason.
FAQs
What is the best time of day for face photos? The golden hours—early morning or late afternoon—offer soft, flattering light ideal for face photos.
How can I make a face photo look professional? Focus on good lighting, sharp focus, and proper composition. Use editing tools to refine the photo while keeping it natural.
Should I use a tripod for face photos? A tripod can help stabilize the camera, ensuring sharp images and allowing for consistent framing.
What are the best apps for editing face photos? Popular options include Adobe Lightroom, Snapseed, and VSCO for professional-quality edits.
How can I make my subject feel comfortable during a face photo shoot? Engage in casual conversation, play music they like, and give positive feedback to create a relaxed atmosphere.